Showing posts with label science. Show all posts

Thursday, October 22, 2015

Pumpkin Carving in 1st Grade

Hello friends and HAPPY FALL!

Jen from Sparkling in Second Grade here :)

We have been immersed in that pumpkin life in my classroom.

I wanted to share some ideas for carving pumpkins in first grade!

At first I thought it was quite a daunting task. In my 6 years of teaching, I had never carved a pumpkin in class. It sounded messy!

This year, I stepped out of my comfort zone because, well, my kids needed me to! All those questions and experiences that can come if I just get over the fact that I'm a control/neat freak and allow those little munchkins to learn and experience new things!

With a lingering pumpkin patch field trip on the horizon, I just knew we had to dig in to our own pumpkins.

Here are some tips to making it a clean and fun exploration!


Here's what you need:
*those cheap carving tools
*latex gloves
*garbage bags
*baby wipes
*cheap led light


The cheap carving tools (which I thought were dumb, but turned out to work WAY better than a knife) worked like a charm to take the top off.

While I talked and cut, my students were on the carpet labeling the parts of the pumpkin (cut/paste from A Year of Many Firsts).

I let me students help me dig out the seeds (and I wore the gloves). I lined them up and gave them a baby wipe after they got to dig some guts out. 

To clean up, I took the pumpkin off the stand, folded up the seeds, took of my gloves and was ready to move on! All while the students colored/cut/pasted their pumpkin parts. We left the rest for the next day (I had placed a new trash bag underneath the pumpkin for the next day).


We used A Teachable Teacher's Pumpkin Carving pack to guide us through as we determined how to cut our pumpkin into a Jack-o-Lantern (as well as a little inspiration from The First Grade Parade with our Jack-o-Lantern tally chart). 

We used the chart to guide us and everyone got a chance to draw their own faces. After we drew, everyone came to the carpet and we tallied up the shapes we used. To carve our class pumpkin, we used the most popular face shapes that were picked.
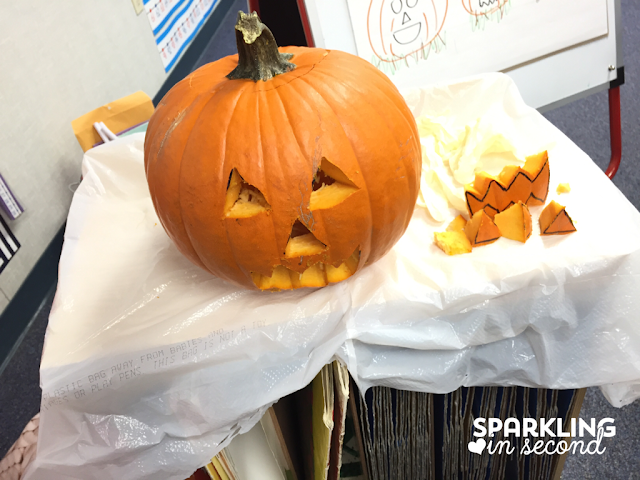

We stuck a cheap light inside and we had ourselves a Jack-o-Lantern!


BOO!

On the third day of this pumpkin extravaganza, we got to taste the seeds! *Note: I do love a freshly baked pumpkin seed, but I did not have time. I just picked some up from Trader Joe's.*

We took a survey before, what did we think it would taste like. Did a taste test and decided if we liked them!


After all this, our pumpkin was beginning to rot! GROSS!

My students asked what happens when it's done being a Jack-o-Lantern and I couldn't help but say, "Let's find out!"

I stuck some caution tape around him and set him outside our door in the dirt.


Now we will watch as he rots back into the earth.

I hope this inspires you and your students! I'd love to hear what you do to make carving easy and fun for your students!

Happy carving!

Monday, April 20, 2015

Science Fun and Flower Rings

Hi There,
I'm Sarah Tharpe Winchell from Teaching Resources for the Classroom.  I am so excited to be part of this amazing group of people that care about teachers and children.

I love teaching science and integrate it as much as possible into our school day! Some days we have those great teachable moments that seem to be getting rarer during these assessment driven times.  This is one of those times! Here in North Carolina it has been raining quite a bit recently. As soon as the rain stops we head outside looking for any place we can play. Well of course rain makes puddles and as long as there are puddles.....kids will play in them! The bigger the rock, the harder the throw.......check out the picture. A nice little lesson about force.


Rain also help flowers to grow! One of our favorite things to do is to put these little buttercup flowers under our chins to see if we like butter.  I'm not sure how this all started. It is one of those passed down traditions.  The sunlight bounces off the little yellow flower onto the bottom of your chin and you see a yellow spot on your chin. No yellow....well you don't like butter! It doesn't work in the shade.  Since this is a Make-It Monday post I'm going to show you how to make a little yellow buttercup flower ring with your kids if you don't have any flowers. Then your children can see the sun reflect onto their chins. Get them to use their inquiry skills by testing the flower under different conditions such as classroom light, shade and bright sunlight. The children just love the magic of it all! It also makes a lovely Mother's Day present!!


You can find the pattern to make the flower ring here.  Flower Ring Pattern Print the pattern on the color of paper you want. I used yellow because I wanted buttercups. Each flower needs two flower pieces. Glue the flowers together with a glue stick. Use the hole punch to place the holes in the flowers. Closer is better. After the holes are punched, thread the ribbon through so it makes a loop on the back and then tie in the front. You can also make a bracelet using the same method just make the ribbon longer. I hope you do have buttercups but if you don't you can still have a sunny day and keep a folk legend going for a whole new group of children!

Cheers and sunshine,
Sarah from Teaching Resources for the Classroom

Monday, April 6, 2015

Grassheads! (with Amanda from First Grade Garden)

Hi there! My name is Amanda and you can usually find me over at the blog First Grade Garden. I'm here today to share with you a fun spring, science project to make with your kiddos. 

But first, let me tell you a bit about myself! I live in Manitoba, Canada with my husband, my baby girl (who just turned 1 on March 31st.... waaaah!), my two labs, and my two cats. We live out in the country on 4.5 acres and are building a new house on our property this summer! 


I have been teaching for 8 years. I have substitute taught every grade from K-9, taught Grade 6, Grade 3/4, Grade 4, and Grade 1. The last four years have been in first grade and that's where I plan to stay! I am also going back to university starting this spring to get my Post-Baccalaureate Diploma in Education. The first course I am taking is about problem solving in early years mathematics! 

I am currently on an extended maternity leave, but I go back to school in September. It was so nice to be able to spend a whole year at home with my baby girl, but I do miss the classroom. That's why the blogging world is so important to me--it keeps me connected with what is going on in other people's classrooms. :)

Ok, now onto my spring, science project. Spring is the perfect time to try a growing project in your classroom. We learn about living things in our science curriculum, so actually growing something is such a fun, hands-on activity for students to learn about how to care for a living thing and the needs of living things. I have grown different things different years, but the grassheads were definitely the most popular with my kiddos.


Materials Needed:
*beige panty hose (1 pair per two students)
*grass seed (about 1 tsp. per student)
*soil (about 1 to 1-1/2 cups per student)
*styrofoam or paper cups
*googly eyes
*elastic bands
*pipe cleaners
*markers
*water

Cut the feet off the panty hose (at about the knee). Place a teaspoon of grass seed into the panty hose (so it's in the "toe"). Scoop about a cup or two into the panty hose as well. Tie a knot in the panty hose to keep the soil from falling out. Form into a ball shape. The knot will go at the bottom. 

On the side of the "face", take a small clump of dirt and panty hose and wrap an elastic band around it to create a nose. Noses can be all sorts of shapes and sizes! Then hot glue googly eyes and a pipe cleaner mouth to the face. 

Have students decorate the cup as a "body". You could be super creative and use paper scraps and stickers. We just used good old fashioned markers. Fill the cup about 2/3 full with water. Sit the grasshead on the cup with the knotted end dangling in the water. Some water will soak up the knot and into the soil. 


Place the grassheads in a sunny spot and give them time to grow! I keep a few spray bottles of water near the grassheads and once a day I would let students spray them. It was usually while they were writing in their grasshead journals and I would pick the quietest table to go water their plants first. I also tell them how many squirts to give. It gets them practicing their counting and prevents over-watering. Win-win!


On the very last day of our plant unit I let the students take their grassheads home. But first, we pull out the scissors and I let my students become hairdressers! Tons of fun!


During the unit we keep track of our grassheads in these little journals. We write about how to make a grasshead, what our grassheads need (soil, water, air, and sun), and a daily journal of how our grass is growing. If you want to try out your own grassheads, you can download the journal for free from {here} or click the picture below!


I hope you give them a try! Growing something all by themselves is definitely a valuable lesson they won't forget. 

Thanks for stopping by! Come visit me over at First Grade Garden sometime. See you next time!