Thursday, July 30, 2015

Getting Your Student's Attention


How do you get your student’s attention?  You are standing in front of your class and you call out “Please look at me.”  Only a few students comply.  You raise your hand and say “Give me 5!”  A few more students comply.  You repeat yourself and ask everyone to please stop what they are doing and look at you.  At this point you can feel your blood pressure rising and your patience growing thin.  Your students know what you expect because they were trained what to do.  So why are they not stopping and paying attention?  You have important teaching to do!  Every teacher can get their students attention quickly and effectively with little to no interruption to learning.


Chapter 6 Whole Brain Teaching for Challenging Kids

I remember all the different attention getters I have used in the past.  It’s A LOT!  Give me five, eyes on me, counting backwards, flipping the lights, time warnings, THE WORKS!  What I realized with each and every one of these was that over time my beloved rascals students became habituated to each of them.  I had to constantly change what I used to get my students attention.  In the words of a very wise woman….”Ain’t nobody got time for that!"

The neo-cortex, the part of your brain behind your forehead, controls decision making. When a teacher says “CLASS!” and students respond “YES!”, you have quickly and effectively focused your students neocortex on what you are going to say next.  Their brain’s executive decision making parts are ready to take directions from you, the teacher. (WBT website). TEACHER HEAVEN!

When introducing the Class/Yes to your students there is a simple script you can follow! This script can be found in the new Kinder-5th Grade Guide to Implementing WBT the first minute, first hour, first day, first week of your school year!  Click the image to download.


Introduction to WBT should begin the moment you meet
your students. I typically must pick up my students from a centralized area of the school on the first day. However, we know that many parents walk their student to the classroom the first day. It’s perfectly fine if this
happens. I will quickly meet them and then let them walk with me to pick up the rest of the students.

Many teachers have a get acquainted activity ready for their students the first day. The students come in and get to work on this activity while the teacher separates and organizes supplies that come in  the first day. I urge you to NOT DO THIS! No I am not crazy. You will use
introducing WBT to your classroom to get all this done.

When my students arrive at my classroom door, after I have picked them all up, they are immediately instructed to put their eyes on me. In the hall is where we begin our year. This is a typical exchange between me and my students.

Teacher: Eyes on me. My name is ____________ . I am super excited to be your teacher! (I use WBT Brainy gestures to say this to my students although they have no idea what I am doing. It will be clear to them later on)
Teacher: When I say Class, you say Yes! Class!
Students: Yes!
Teacher: When I say Class, you say Yes and fold your hands together and put your laser eyes on me. Class! (fold your hands)
Students: Yes (folding hands and looking intensely at you)
Teacher: However I say Class, you say Yes! Class! Class! (Fold your hands again to remind them.)
Students: Yes! Yes!! (Students fold their hands and look at you.)
Teacher: Oh, class!
Students: Oh, yes!
Teacher: Classadoodle!
Students: Yesadoodle!

Class/Yes can get your students attention in the blink of an eye! Want to get the attention of an entire cafeteria? Use class/yes! Need to get the attention of the entire school at an assembly? Use class/yes….it is MAGIC!

Teacher: Class, Class Class!
Students: Yes, Yes, Yes!
Teacher: Please, sit down as quickly and quietly as you can!
(Students sit in hallway)
Teacher: Class! (folding hands)
Students: Yess! (folding hands)
Teacher: My name is _____ and welcome to our classroom. (Use
oral writing)

Watch to see that your amazing scholars are following directions and focused on you! Delight in the fact that before you have even walked into the classroom your students are eating out the palm of your hand. You have made it through the first minute in your WBT classroom.

This is just an introduction to WBT for your classroom.  Many teachers use class/yes and nothing else!  That’s a good start but I encourage you to go further.  You have already set the tone for your classroom giving you a way to get your students attention immediately and effectively without wasting valuable teaching time.  There are different ways to change up the class/yes and even a way to add review of standards to your attention getter!  How cool is that!  Using every moment of the school day to facilitate learning is key in WBT!

Here is a little FREEBIE for you in your WBT Classroom!  This cute little pack includes procedure signs to help you remember to use them, including the CLASS/YES!


Have you used class/yes in your classroom?  What did you use before finding class/yes?  How did class/yes transform your classroom environment?  Share your thoughts below!

Wednesday, July 29, 2015

"Rock your Writing Center" Giveaway

 Hello! This is Megan Mitchell from First Grade Roars.  Today I'm going to share with you how I have set up my writing center using this resource.  It is filled with goodies to make writing so much fun for your students.  
Before I begin I want you to know that I use this during my rotation time.  I still do whole group writing workshop.  This is what my students use when making a choice during their writing time during Daily 5.
Let's begin with a picture of my writing center area!
There are 12 choices my students can choose from when the entire center is up and running.  We do mini lessons on each style of writing along with a lot of practice in writer's workshop.  Once I feel the students are ready to work on a new style of writing independently, I open that number in my writing center.  Below is a zoomed in picture of "Label a Picture".  This is the first thing we learn how to do in 1st grade.  You will see on the green clip a smiley face.  If it has a smiley face, it is open.  (I got these cute little chalkboard clips in the party section at Hobby Lobby, in case you were interested.)
There is also a number 1 on this chalkboard.  I have a matching number 1 on a tub below containing the paper they would use for this activity.  Here is an example of what the tubs look like up close.
 Inside each tub the children will find everything they need to complete the activities.  Here is a sneak peek into a few more tubs.
Each day many students visit this writing area.  There is a separate table where they do their writing.  
At the table there are crayons, spacers, pencils, HUGE erasers, clip boards, dictionaries and a thesaurus.  Each child has their own file folder where they keep their writing if they don't have time to finish.  Inside their file folder is also an amazing resource from Natalie's Nook!
Link to Natalie's Nook Personal Dictionary
Also I might add that on the first day of school I let the children color their file folders!  It is an easy activity that they can all do as morning work and it takes some time while I teach the children 1 table at a time how to unpack their book bags.
Also included in this writing packet is a sight word dictionary.  I have 5 of these on the table for the students to use.  
When they finish their writing they use the Editing Checklist and turn it into the Published Work Basket.  Before we begin our Daily 5 the next day we share some of our work with the class.  They love to read and share their writing.

I used this writing center last year and my first grader's loved writing.  It offered them choice and they were able to use what they learned in whole group and transfer it over to their independent work!
I would love to share 2 of these packets with some lucky winners.
https://www.teacherspayteachers.com/Product/Rock-Your-Writing-Center-1358547


Enter the rafflecopter below!


Thanks for checking use out at iTeach First! You can also visit me over at First Grade Roars


Tuesday, July 28, 2015

Using Voicethreads with Mrs. Groom's Room


Hello sweet friends!  

It's Shana Grooms from Mrs. Grooms' Room!  I hope everyone is having a great summer.  School has already started for some, (Can you believe that?  Wow!), and some of us are getting ready for the big day. Yikes!!  

I wanted to share one of my favorite websites and app called Voicethreads that I like to use throughout the year:


I don't know how often many of my friends out there use VoiceThread but it is such an easy website to use and it's an AWESOME way to showcase your student's work, ideas, and projects.  It is a website that you can use to showcase and tell about your work, whether it is a painting or story or project. Friends, family, or teachers can comment on the project as well.  So if Johnny tells about his writing, then Grandma can say, "Johnny, you did a great job!"

Here is one that I did a couple of years ago with my students.  They wrote the script themselves AND read it on the mic!   Their voices are so cute especially when the roots hold the plant in the ground!!  :)


Here is one that I did for my substitute teachers...ya know...when I am out because of mental exhaustion and anxieties?    It goes along with my sub plans for The Little Red Hen!  If you have them, use my Voicethread!  And you can hear me!!  Aaghh!  :)  (And the funny part is I tried to use character voices! What was I thinking?)


Here is what you can do to get started on VoiceThread:
1)  Set up an account.  It is free for the first five VoiceThreads!

2)  Take pictures of what you want to comment on or read about.
3)  Upload your pictures to VoiceThread.
4)  Comment on your pictures.  (This means reading the page or saying something about your picture.  It could be you commenting, one of your students commenting, or it could be many of your students commenting!)
5)  You can share your work with family and friends.  They can comment on your work too!  Cool, huh?
6)  You can use it on your iPad, too!!!  


It is very, very easy.  In fact, I would dare say it is easier than most programs. I promise, if you try it...you will love it.  I do one or two every year.  It is great technology practice for the younger students and they just die a little when the hear their voices.  Haha!  


By the way, here is one I did of Pumpkin Jack....not my best by far but my poor copy of Pumpkin Jack was truly decomposing so I had to find a way to save him!


Let me know how you use VoiceThread!  Hope you have a great start to your year!! 
post signature

Saturday, July 25, 2015

Open House Ideas


So, are you getting ready to meet your students and parents for the first time?  We have our Open House/Meet the Teacher night a couple of days before school starts.  I do like that we do it this way because it gives the kids a chance to come and meet me, see the classroom, and bring their supplies prior to the first day.  I know it helps some kids that are really nervous about starting a new school year. 

What a WHIRLWIND though, right?  You get to meet all of these new students/parents in a short amount of time.  They ask you all sorts of questions or give you a “heads up” about their child.  I always keep a paper and pencil nearby to jot down anything important they feel the need to tell me that night.

Here are 5 Open House Ideas that may help you prepare!

1 I use a Powerpoint file that I project onto the Smart Board.  I run it in a continuous loop.  It contains some important information that parents may have questions about.  This way, they can see the answers to some of their questions before asking me.


2 I order magnets from Vistaprint that contain all of my contact information.  I have had several parents comment about them.  They seem to be a hit, so I keep getting them.


3 I make a little “treat” bag for the students with a cute Welcome poem on it.  These are free in my TPT Store.  There are several different backgrounds to choose from also.


4 You know those cute little paper tablets that are in the shape of different things like apples or frogs?  I have a zillion of these pads of paper and this is one way that I use them.  I put one on each students desk and the parents write their child a little note for the first day and put it into their mailbox.  When the students leave the first day of school, they get a note from their parents.  If I have parents that don’t come to Open House, I write a note to those students so that they aren’t left out.


5 Lastly, I take their picture when they come in to meet me!  I have them hold the sign below.  It is also free in my store and I have K-4.  I use these pictures to put into their Time Capsule that we do at the end of the year.


I hope these ideas have inspired you to get things going for Open House!  I need to get busy myself!


Wednesday, July 22, 2015

What Do I Do Now? Strategies for Early Finishers

early finishers
Hi!  This is Jaymie from First Grade Centers and More. 

One of the biggest challenges teachers face in the classroom is keeping all of our students engaged and challenged.  Even with the best differentiation some students finish their assignments quickly, while others need more time.  


I try not to rush students (as long as they are on task), but what about the students who finish quickly?  I believe students love to have some free choice time, where they direct their activities.  I am a huge supporter of choice in the classroom for students, but it needs to be done in a structured way to avoid off-task behavior.

Here are some of the choices I give my students when their work is done:     


reading centerreading center
          This cutie chose to spend his entire indoor recess reading!


1.  READING!  Seriously, my students LOVE to read!  First Graders are usually so excited about this new emerging skill they have.  There is truly no way to become a better reader, than to DO IT!  

I have a HUGE classroom library with tons of books from very emergent readers to up into third grade level (I have a few higher level ones hidden in a closet). I have gotten books at garage sales, from Scholastic Book Clubs, from a yearly sale our local library has, and from parents of current/former students.  If you don't have a large classroom library, start collecting!

2.  Accelerated Reader.  I know, I know, you either love it or hate it!  My school is a huge AR school.  For many of my students, they can't wait to take AR tests. They love watching their flower grow and their points accumulate.  I don't put a lot of pressure on taking AR tests.  But it is always an option they can choose when their work is completed.
writing center

3. Writing!  My students have a writing journal they keep in their desks.  When they have time, they can write a new entry.  They can also go back and reread old entries, or add to a picture or story they were still working on.  They can also get a writing activity from our writing center.  I keep the writing center well stocked with all sorts of seasonal paper, letter writing templates, and they love the animal cards pictured above.  If they don't have a writing idea, they can grab an animal card and take it to their seats to write what they know about the animal.


4. Spelling Practice:  My students LOVE to do this activity to practice their spelling words.  You can visit First Grade Adventures Blog and read all about it.  It is a simple activity to prep, and the students NEVER get tired of it!


5. Math Games.  I often keep simple math centers that are easy to play (and easy to clean up quickly) available for students to use when their work is done. Students also have addition flashcards in their desk they can practice.  The fun game below is from mathwire.com .  You can click the picture to head over to their AMAZING site!

Those are a few of my students favorite fast finishers activities.

early finishers

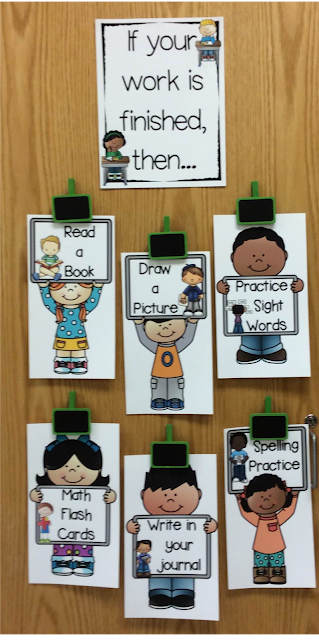
Last year I started using a work completed board to help my students stay on-task when they had free choice time.  I LOVED it!  The visual clues really helped students to know what their options were. If students weren't sure what to do, I could quickly point them to the board. Also, if students were off-task I could say something like "I don't think ______ (talking, etc.) is one of our choices on our finished work board." I also love having the cards on these clothes pin clips, it makes it easy to change out the options for students.

If you are interested in seeing the fast finishers bulletin board set, you can click on the picture below to head over to my TPT store.  There are currently 34 different fast finisher options to choose from.


early finishers


I am also going to give away three sets of the bulletin board.  You can enter in the Rafflecopter below!


Thanks for checking out my ideas for fast finishers!  I'd love for you to visit me at my personal blog as well!

Jaymie :)


Saturday, July 18, 2015

Writer's Workshop by Amanda {First Grade Garden}

Hi everybody! I'm so excited to be back here at iTeach First! It's been awhile since I've posted here, so I can't wait to share with you today! Today I'm going to show you and tell you about how I teach writing in my classroom. I have a bunch of pictures of activities I have done throughout the last few years and I will post links to the units and freebies I used!

I do a Writer's Workshop in my classroom. I have about 35 minutes for writing, so I break up my time like this:


Each month we focus on a different genre of writing:


My mini-lesson is short and sweet. Ten minutes max. Sometimes I model writing--thinking out loud as I write. Sometimes I read a mentor text. Sometimes we practice fixing up some writing. The lesson is connected to the genre of the month and usually addresses something I see in my students' writing or something I would like them to try in their writing.

Below is an example of a personal narrative story map example we did, based on the book Patches Lost and Found. Next some modeled writing--I think I asked my students to help me make my writing more interesting. This was a pretty boring story of a really exciting event! lol. And then some editing work with Mr. Fix-It himself!


After the mini-lesson, it is writing time! Writing time is just that. A time for students to write. We build up our stamina in September and do a lot of work with procedures--thinking of ideas, proper sentence formation, goal setting, etc. We do special writing projects such as these ones below, but we also do a lot of choice writing where students can pick their own topics.

I Like Pattern Stories -- freebie on my blog
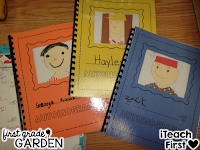
Autobiography -- unit from The Teacher Wife

All About... Expert Stories -- freebie on my blog
Fractured Fairy Tales -- from my Fairy Tale units

 
Non-Fiction Animal Books -- unit by me
Ouch Story Personal Narrative -- idea on my blog

How To Blow Bubbles Writing -- freebie from The Teacher Wife
How To Get Ready for Recess -- freebie on my blog

While my students are writing independently, I confer with about 4-5 different students each day. I just take my little clipboard over to their table and talk to them about their writing. I usually only spend about 5 minutes per child and I see every child at least once a week. I ask them questions about their writing, talk about the writing goal they are working on (I ask them if they can show me evidence of the goal in their writing or we see if there is something they can work on), and compliment them on something they are doing well. On my clipboard I have two papers--a goal recording sheet and just a plain note taking sheet (looks very similar to the goal one except it already has the students' names on it--so I confer with all students before going back to the beginning again). I keep track of the goals they choose by writing a quick note. I will sometimes put down a check mark or x each time I confer with them to see how they are doing with their goal. If I am seeing a bunch of check marks, it must be time to set a new goal! The other observation sheet just has space for anecdotal notes to mark down areas the student is doing well in and things they need to work on (perfect to refer back to for report card writing!).


To keep track of my students' writing goals, I created this board. I bought a small magnetic white board from Staples, divided it into ten sections with ribbon, and attached magnets to the goals. (I change out the goals as the year progresses, to reflect my students' ability levels.) Then I created pencils with my students' names and added magnets to the back of them as well. I let my students choose their writing goal, but sometimes during conferences I might strongly suggest a new goal, such as "You are getting really good at leaving finger spaces between your words, but I see that sometimes you forget to put periods at the end of your sentences. Maybe you could make that your next goal!"


If you are interested in setting writing goals with your class, check out me new pack by clicking the picture below. There are 30 different writing goals to choose from and 3 types of editable pencils to use with your students' names. My goal conference sheet is also in there too!


Last but not least, it's sharing time! I pick two or three students to share something they are working on. Then we usually do two stars and a wish--tell the author two awesome things about their work and one things they could work on or add to their writing to make it even MORE spectacular. We usually focus our suggestion on the writing goals from the board.

Phew! You made it to the end! Sorry about the overload of pictures! I hope you got some fun writing ideas to try next year though! Don't forget to come check me out at First Grade Garden!
Photobucket